Callibrity recently relocated to a new, much larger office. Being in a bigger space, we were not able to rely on hearing someone knock to let them in. Enter the solution: a cheap wireless doorbell. It allowed us to listen for visitors, even at the back of our office, but it didn’t come without issues. The receiver typically sat in the front of the office, where the people closest to the door could hear it. This meant that someone had to lug the receiver around every time they got up for a drink or needed to talk to someone. On top of that, if whoever normally listened for the doorbell was out of the office, the receiver had to be handed off to someone else. Otherwise, we would potentially miss visitors, deliveries, or other guests.
The Idea
We came up with the concept of a system which would detect a doorbell press and directly notify team members independent of the doorbell’s own receiver. There were just two pieces of the puzzle we needed to figure out in order to pull it off. We needed a way to detect the doorbell, and we needed a way to notify people in the office.
Notifications
Broadcasting notifications seemed straightforward. Slack, a messaging platform for teams, is something we use extensively as a company. Its desktop and phone apps allow for instant messaging to all of our employees. We could simply send a message to an individual or channel and they would be notified that someone is at the door. As a bonus, Slack also has a set of tools for custom messages and interactivity, leaving our implementation open for cool features in the future.
Doorbell Detection
Detecting the ring of the doorbell was more difficult to plan out. Initially, we thought about physically modifying the doorbell receiver by hooking up a circuit which would detect when it had been pressed. However, we wanted to avoid taking the doorbell out of commission while we were working on it, as well as the possibility that we would break it altogether. Intuitively, we knew that the doorbell had to be transmitting some kind of signal to alert the receiver that it had been pressed. So, rather than modifying the circuit of the receiver, we decided to intercept the signal of the transmitter. With planning out of the way, we could get into the details of how we were going to make the idea work.
The Research
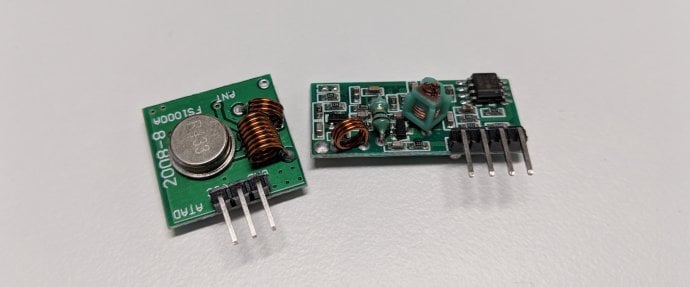
First up on the list of what we needed to know was how the doorbell communicated with itself. We quickly discovered that it (and many other wireless appliances) used 433MHz radio. We had wanted to use a Raspberry Pi to act as the brains behind our project all along, but we didn’t know how to have the Pi communicate over radio frequencies. We searched around and found these cheap 433MHz RF transmitters (TX) and receivers (RX) on Amazon (although a transmitter was not really required for the project). Once they arrived, we hooked them up to an Arduino on a breadboard, ran some simple code, and transmitted a test message over radio waves. Great! We got something running and confirmed the chips were working!

First Draft
We found a very useful article on Instructables which went over home automation with remote controlled power sockets. Although not the same appliance, the underlying technology of radio control was the same, which gave us a great starting point. They even used what looked like the same type of TX/RX pair that we had!
Using their Python sniffer script, we tried to figure out the codeword our doorbell transmitted on a button press. At first, all we could see was static. With some digging, we uncovered how the RX chips operate. As it turns out, the chips have an amplifier which will try to increase the signal if they aren’t receiving a strong one. Unfortunately, this also means that when they don’t see a signal, they will amplify to the point that internal noise will cause random output. According to what we found, the static seemed to indicate a “normal” output, and we were just not receiving anything. This led us to believe we were out of range. Moving closer, we continued to run the sniffer, but we were still unsuccessful. Only after we were literally within an inch of the button, did we receive any transmissions. Hooray!
Upgrades
Still, the lack of range was a pretty big issue. We would have practically had to tape the circuit to the button to get it to work in that state. We tried making multiple antennas, soldering them to the receiver, until we realized that part of the board may have been faulty. We bought another pack of the same type of receivers, but still the range issue persisted. It looked like we were going to need a more powerful type of receiver.
The RF receiver we had been using leveraged a technology known as super regeneration. Without going into too many details, the quality of these chips is known to be lacking, and the range leaves much to be desired. Another style, known as superheterodyne, is a higher quality receiver and gets much better range. We ended up picking this model from Amazon.
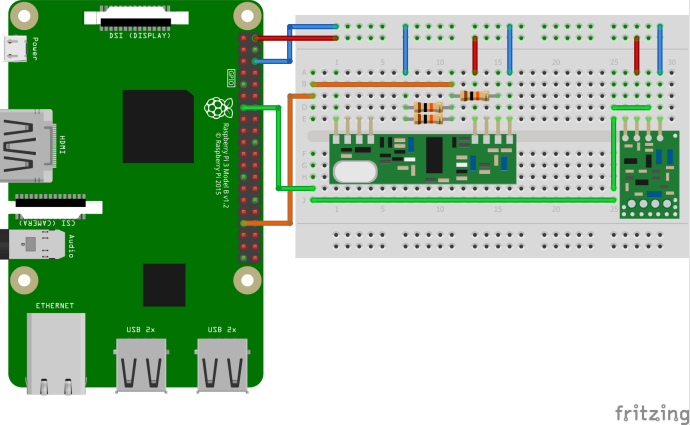
After installing the new transmitter and receiver, the layout of the circuit looked like this:

As you can see, the layout of our real circuit doesn’t exactly match the diagram, but they are connected in the same way. The diagram was simply drawn to keep wire crossing to a minimum.

If you’re not familiar with breadboards, here is an article that does a good job of explaining how they work. The circuit is straightforward, we just connected the chips according to the labels printed on the back. But, you may be wondering what the three resistors are doing in the circuit. They are functioning as a voltage divider. The Raspberry Pi’s GPIO pins work off of 3.3v, but the RX chip requires 5v to work. If we were to connect the data pin of the RX directly into the Pi, we would run the risk of damaging it. The voltage divider, as the name suggests, splits the voltage and gives us a safe value for the Pi.
Decoding the Transmissions
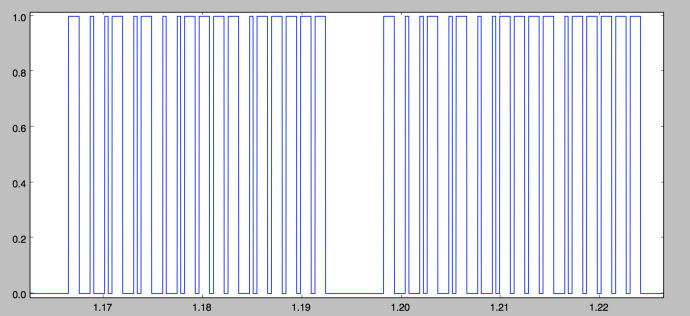
With the new chip, the doorbell transmissions were clearer and the range was enough to reach the back of our office. We were able to re-run the sniffer script and get an accurate graph of the transmitted code.

As you can see in the graph, there is an obvious pattern, and you may be able to make out the code already. Bits are represented by the duration of a high signal (the pulse width) and the amount of time in between pulses. A binary 0 consists of a short low and a long pulse width, while a binary 1 is represented by a long low and short pulse width. From this, you can see that the code for our doorbell is 011010110000100000.
We modified the script to export an additional CSV file containing all of the data collected. This gave us exact timing data from the Pi, rather than having to estimate from the graph. Using this data, we collected the mean and standard deviation of all timings for the various features of the code. To put our transmitter to use and test out the timings we just calculated, we decided to see if we could ring the doorbell with a Python script. Not only were we successful, but with an antenna, we were able to reach the doorbell receiver all the way from the back of the office!
The Solution
Now that we had determined the timing for the doorbell and knew what the receiver was looking for, we had to figure out how to decode the signals and acknowledge the button press. This was done through an algorithm that we wrote in Python, utilizing the RPi.GPIO library to query the Pi’s GPIO pins.
Decoding Algorithm
def receive_codes():
    GPIO.setmode(GPIO.BCM)
    GPIO.setup(RECEIVE_PIN, GPIO.IN)
    code_word = 0

    while True:
        high_delta = get_delta(GPIO.HIGH)
        bit = decode_delta(high_delta)
        code_word = (code_word << 1) + bit if bit is not None else 0
        low_delta = get_delta(GPIO.LOW)

        if timings['code_delay'](low_delta.microseconds / 1000000.0):
            if validate_code(code_word):
                print("{} Ring-a-ding ding!".format(code_word))
                notifier.notify(NOTIFY_HOST + '/ring', {'source_id': SOURCE_ID, 'token': SERVER_TOKEN})
                time.sleep(4)
            code_word = 0
Functions used in the algorithm have been omitted for brevity, but the full source can be found here on GitHub.
The algorithm itself works based on time deltas. We continue to query the GPIO pin until a high signal is received. Once a high signal is detected, we begin recording the duration of time that it remains high. The time delta is only concluded when a low signal is recorded. Then, we can decode that duration by comparing it with the timing data we collected. If the time matches the characteristics of a 0 or a 1, we append that to the end of our code word. Meanwhile, we continue collecting a time delta for the low signal. If the time delta is within the range of the known delay between code transmissions, we consider the codeword complete and send it off for validation.
Interacting with Slack
When the algorithm detects a valid code, a request will be issued to a web server. The server is running on the same Pi and written with Node.js and Express. If you’re interested, you can find the source code here. It’s pretty basic and contains just two routes of interest.
The first one, POST /ring, is an endpoint used by the Python script to let the server know someone’s at the door. In the future, we could add extra receivers for different doorbells and integrate them into the existing system by just having them call this endpoint.
The second, POST /slack-ic, serves as a webhook for Slack so that we can use interactive components. When someone rings the doorbell, we generate a message in Slack that has a button, allowing someone to “claim” the doorbell. When someone clicks the button, Slack calls this endpoint with data about the interaction. This lets us replace the message with an updated one and remove the button. In our case, we set the message to show who clicked the button: “E.J. is getting the door!”.

Currently, the Slack bot is set up to send notifications to a single, dedicated #doorbell channel. But, in the future, we’d like to add features to direct message specific users and abide by user defined time windows for when they want to be notified. It’d also be fun to have some music start playing, a disco ball descend from the ceiling, and a confetti cannon for our visitors but, unfortunately, that will have to come at a later date.
Learn how Callibrity builds IoT solutions for our clients
To learn more about how Callibrity can help your organization, email us at contactus@callibrity.com to schedule a time to connect.


